Friday, April 30, 2010

How well do you know your landmarks?

Fun little test here, only 16 multiple choice questions...with pictures!


Click here Guess the Spot! to play

Black Forest Cheesecake


1 c Chocolate Wafer Crumbs
3 T Margarine, Melted
16 oz  Softened
2/3 c Sugar
2 ea Large Eggs
6 oz Semi-sweet Chocolate Chips *
1/4 t Almond Extract
21 oz Cherry Pie Filling (1 Cn)
1 x Frozen Whipped ToppingThawed
* Chocolate Chips should be melted. ~————————————————————————– Combine crumbs and margarine, press onto bottom of 9-inch springform pan. Bake at 350 degrees F., 10 minutes. Combine and sugar, mixing at medium speed on electric mixer until well blended. Add eggs, one at a time, mixing well after each addition. Blend in chocolate and extract; pour over crust. Bake at 350 degrees F., 45 minutes. Loosen cake from rim of pan; cool before removing rim of pan. Chill. Top cheesecake with pie filling and whipped topping just before serving. 

Easy Blender Hollandaise Sauce


Many people are afraid of hollandaise sauce, are you? Some think eating it will make them fat. (It will if you eat it every day, so don't eat it every day.) If you are like me, the thought of making hollandaise conjures up visions of toque clad chefs with big bowls and even bigger whisks swearing because the beautiful sauce they have spent the last several minutes vigorously whisking has separated on them, "Merde!"
I have been desperately afraid of making this sauce since forever. (Not afraid of eating it mind you, I've never met an eggs benedict I didn't like, or eat.) To overcome this fear I asked my friend Hank to show me how to make it. OMG. Hank's hollandaise didn't separate, and he didn't swear (any more than usual), but the work! The beads of sweat forming on this man's forehead as he whipped those egg yolks and butter into submission. I was dreading the attempt. Hank has arms of steel. I have arms of, hmmm, a young, willowy sapling? Whatever. Not steel.
The solution? Blender hollandaise. It's easy! Even I can do it. Which means even you can do it. So I encourage you to try it, if you like me have been intimidated by the thought of attempting this sauce. Use it over fish, steamed vegetables like broccoli or asparagus, or on top of poached eggs, bacon, and English muffins.
Print Options

Easy Blender Hollandaise Sauce Recipe

INGREDIENTS

  • 3 egg yolks (see how to separate eggs)
  • 1 tablespoon lemon juice
  • 1/2 teaspoon salt
  • 1/8 teaspoon cayenne (optional)
  • 10 tablespoons butter

METHOD

1 Melt the butter slowly in a small pot. Try not to let it boil – you want the moisture in the butter to remain there and not steam away.
2 Add the egg yolks, lemon juice, salt and cayenne (if using) into your blender. Blend the egg yolk mixture at a medium to medium high speed until it lightens in color, about 20-30 seconds. The friction generated by the blender blades will heat the yolks a bit. The blending action will also introduce a little air into them, making your hollandaise a bit lighter.
3 Once the yolks have lightened in color, turn the blender down to its lowest setting (if you only have one speed on your blender it will still work), and drizzle in the melted butter slowly, while the blender is going. Continue to buzz for another couple seconds after the butter is all incorporated.
4 Turn off the blender and taste the sauce. It should be buttery, lemony and just lightly salty. If it is not salty or lemony enough, you can add a little lemon juice or salt to taste. If you want a thinner consistency, add a little warm water. Pulse briefly to incorporate the ingredients one more time.
Store until needed in a warm spot, like on or next to the stovetop. Use within an hour or so.
Makes about 1 cup of sauce, good for about 4-6 servings.

Eggs Benedict


Eggs Benedict  Making eggs benedict requires careful orchestration. You have to have warm, crispy bacon, hot buttered toasted English muffins, eggs poached perfectly to your desire, and a warm, creamy, unbroken Hollandaise sauce, all at about the same time. No wonder I rarely eat eggs benedict unless I'm eating out, my brain is scrambled enough as it is in the morning without having to juggle in the kitchen. That said, if you know how to toast an English muffin, know how to cook bacon, and know how to poach eggs, then the only element that is not your standard fare is the Hollandaise sauce, which is actually quite easy if you have a blender. There may be an occasion, such as Mother's Day for example, for which you might want to make a special someone, such as your mother, something special for breakfast or brunch. Eggs benedict is as special as they come. Believe me, if you make these for me, I will worship the ground you walk on. Eggs Benedict Recipe Eggs benedict is also great made with slices of smoked salmon in place of the bacon. If you are in or around New Jersey, try it with Taylor ham. INGREDIENTS 8 pieces of bacon or 4 pieces of Canadian bacon 2 tablespoons chopped parsley, for garnish 4 eggs 2 teaspoons white or rice vinegar 2 English muffins Butter Blender Hollandaise 10 Tbsp unsalted butter 3 egg yolks 1 Tbsp lemon juice 1/2 teaspoon salt Dash of cayenne or tabasco METHOD 1 Start with the bacon. Heat a large skillet on medium low heat. Add the strips of bacon or the slices of Canadian bacon. Slowly fry, turning occasionally, until the bacon is browned on both sides, and if using strip bacon, much of the fat is rendered out (about 10 minutes). Use tongs or a fork to remove the bacon from the pan, set on a paper towel to absorb the excess fat. Don't pour the bacon fat left in the pan down the drain! Either sop it up with paper towels when it has cooled a bit, or pour it into a jar to be used later (see rendering bacon fat). 2 While the bacon is cooking, bring a larage saucepan two-thirds-filled with water to a boil, then add the vinegar. Bring the water to a boil again, then lower the heat to a bare simmer. 3 Make the blender hollandaise. To make blender hollandaise, melt 10 Tbsp unsalted butter. Put 3 egg yolks, a tablespoon of lemon juice, 1/2 teaspoon salt in a blender, blend on medium to medium high speed for 20-30 seconds, until eggs lighten in color. Turn blender down to lowest setting, slowly dribble in the hot melted butter, while continuing to blend. Taste for salt and acidity and add more salt or lemon juice to taste.Transfer it to a container you can use for pouring and set it on a warm – but not hot – place on or near the stovetop. 4 Poach the eggs. Here is an easy method for poaching eggs. Essentially, working one egg at a time you crack an egg into a small bowl and slip it into the barely simmering water. Once it begins to solidify, you can slip in another egg, until you have all four cooking. Turn off the heat, cover the pan, and let sit for 4 minutes. (Remember which egg went in first, you'll want to take it out first.) When it comes time to remove the eggs, gently lift out with a slotted spoon. Note that the timing is a little variable on the eggs, depending on the size of your pan, how much water, how many eggs, and how runny you like them. You might have to experiment a little with your set-up to figure out what you need to do to get the eggs exactly the way you like them. 5 As soon as all the eggs are in the poaching water, begin toasting your English muffins. If you can’t get all the muffins toasted by the time the eggs are ready, gently remove the eggs from the poaching water and set in a bowl. 6 To assemble the eggs benedict, butter one side of an English muffin. Top with two slices of bacon or 1 slice of Canadian bacon. You can trim the bacon to fit the muffin if you’d like. Put a poached egg on top of the bacon, then pour some hollandaise over. Sprinkle some parsley over it all and serve at once. Makes 4 one-egg one-muffin servings of eggs benedict.

Wednesday, April 28, 2010

Unshorn sheep surfing at the seashore

You know..just when you think you have seen everything!

Almond Meringue (Dessert for Mother’s Day)

From Christine's Recipes

These meringues can be kept in an air-tight container for quite a long time, or if they turn soft outside, just pop them in the oven and heat them to dry again. There are many variations you can make, for example, spread some chocolate cream between two mini meringues or simply sprinkle a bit of coco powder over the surface of meringues to your liking. It’ll be a great looking present for your mother. Sweet !
Almond Meringue01
Almond Meringue (Dessert for Mother’s Day) (Printable recipe

Makes 60 meringues (4cm in size)

Ingredients: 
  • 4 egg whites (I used 59 gm eggs)
  • 1 tsp cream of tar tar
  • 120 gm caster sugar
  • 90 gm almond meal
Egg Whites

Method:
  1. Prepare oven to 180C (356F). After 10 minutes, reduce the temperature to 90C (195F). Prepare 2 large baking trays lined with non-stick baking paper.
  2. In a large clean, stainless steel or glass bowl, beat egg whites with an electric mixer. (Note: make sure that your eggs are free from any water and oil. It’s very difficult to beat the egg whites and produce a good volume otherwise.) Start with the low speed of your mixer. When many bubbles form, add cream of tartar and continue to beat.
  3. When the egg whites turn white and increase in volume. Add 1/3 of sugar at a time. You don’t need to worry whether the sugar is beaten well after each addition. After adding the last batch of sugar, increase speed to high, continue to beat the egg whites until peaks form. When the mixture becomes very thick and glossy (as the picture shown above), all the sugar has dissolved, it’s done. You can test it by lifting up the beater, there should be a long trailing peak forms at the end of the whisk.
  4. Sift and fold in 1/3 of almond meal at a time, until all almond meals are completely incorporated. Don’t stir the egg whites. Just scrape the egg whites from the bottom and bring them up to the top. By folding in this way, you won’t loose the air and volume of egg whites. Carefully transfer the egg whites into a piping bag. Pipe out 4cm-sized discs on the lined baking trays. Each with 3cm apart. Transfer the meringues into the oven for 75 to 80 minutes. Then, turn the oven off and let the meringues cool in the oven. It might take a few hours. (Note: In doing so, the outside of meringues are set without any baking at all. So the colour of the meringues is very light, pale or off-white. And the texture of the meringues is very crisp and light in weight.)
Almond Meringue02

Notes:
  • Before beating egg whites, make sure the utensils are clean, free from any water or oil. It’s very crucial if you want to beat egg whites successfully.
  • You can omit the almond meal if you want to.
  • When you fold the almond meal into the fluffy egg whites, make sure to incorporate the ingredients gently without deflating all the bubbles of whisked egg whites. Don’t even stir it. Just scrape the egg whites from the bottom and turn them up on the surface. Repeat the folding with a quick but a gentle motion until all ingredients are just combined.
Almond Meringue03


Read more: http://en.christinesrecipes.com/2010/04/almond-meringue-dessert-for-mothers-day.html#ixzz0mPhZWNJa

Pasta With Tomato-Blue Cheese Sauce

From The Pioneer Woman

Pasta With Tomato-Blue Cheese Sauce

Apr. 28, 2010
TPW_6080I’ll just say it: I’m on a pasta kick lately. I’d like to believe—and in fact, I’m telling myself daily—that the sudden uptick in pasta dishes I’ve been making is being spurned on by some kind of deficiency deep within my body. A carb deficiency, perhaps. Yeah…yeah…that’s it. I don’t get enough…carbs, you see, so my body is crying out for more…pasta.
Yeah…yeah…that’s it.
Okay, fine. But it’s far better than facing the truth: that carbs fill a gaping emotional hole in my psyche.
Anyway, I made this pasta the other day. Marlboro Man and the kids had just left for the farm for two days, which meant I could cook something for dinner that didn’t contain animal flesh. I remembered a recipe I’d seen in Cooking Light (I can hear you laughing) somewhere recently—an airport? A waiting room? My psychiatrist’s couch? I can’t remember. But it was a pasta recipe with a (fresh) tomato-blue cheese sauce, which appealed to me very much because I’ve also been on a big blue cheese kick over the past several months. The dish also contained spinach and a couple of other ingredients I couldn’t remember.
I adapted it for my own sick and twisted use. I apologize to Cooking Light for my changes, which were not light at all.

TPW_6001Here’s what you need: Thin spaghetti (or angel hair), canned diced tomatoes (you can use fresh), olive oil, garlic, blue cheese, heavy cream, salt, pepper, crushed red pepper, and baby spinach.


TPW_6014
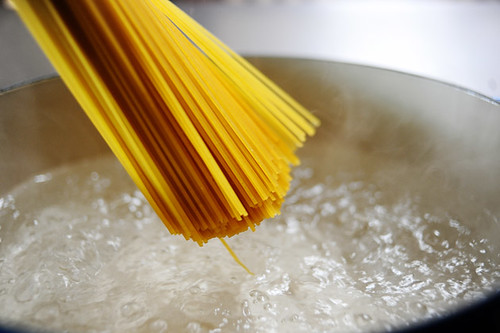
Cook some thin spaghetti or angel hair. Keep in mind that if you’re using angel hair, it only takes a couple of minutes (at most) for it to cook!


TPW_6002Chop up some garlic…


TPW_6004
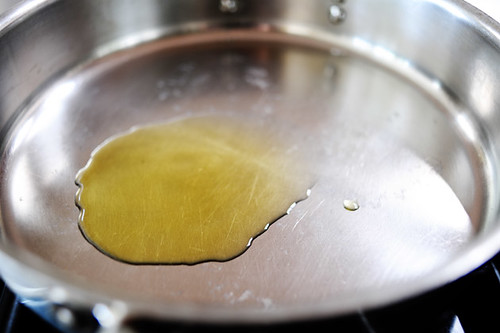
And heat some garlic in a large skillet.


TPW_6007
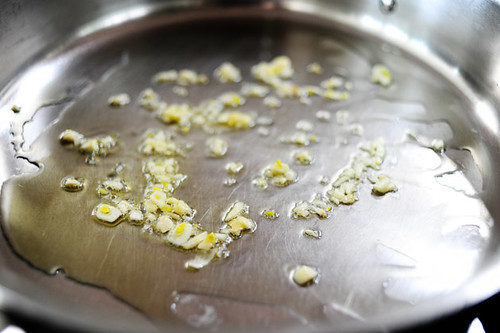
Throw in the garlic and get it started…


TPW_6012
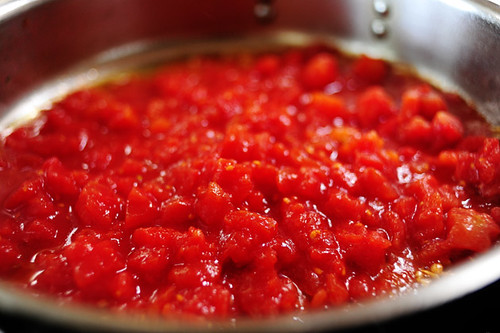
Then pour in one 28-ounce can of diced tomatoes. I drained as much of the juice as I could—you don’t want it too soupy.


TPW_6017
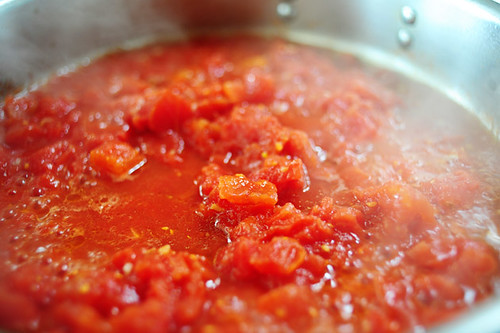
Stir it around and cook the tomatoes.


TPW_6020
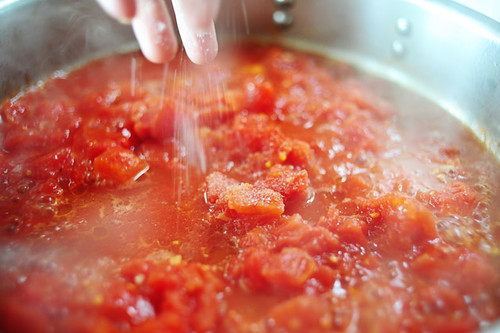
Sprinkle in a little sugar and salt…


TPW_6021
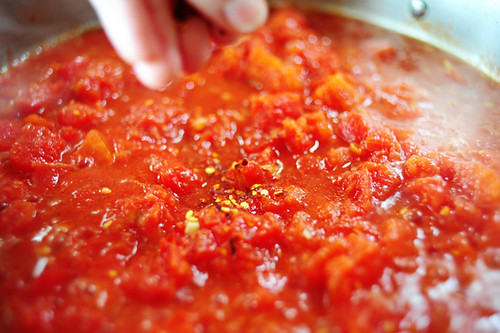
And some crushed red pepper, which gives it some oomph.


TPW_6032
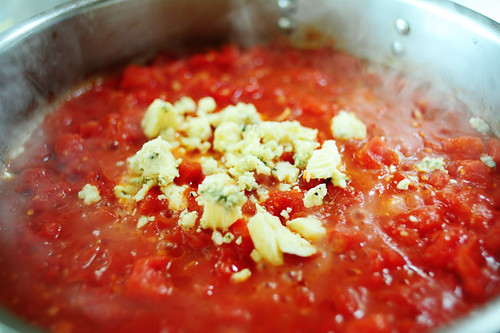
After it’s cooked for about 10 to 15 minutes, add in the crumbled blue cheese. I did a heaping 1/2 cup, but feel free to add a little more if you like that strong cheesy tang.


TPW_6037
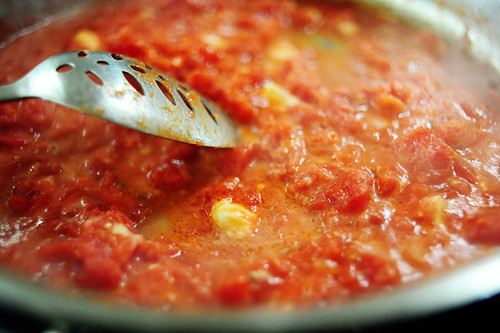
Stir the cheese into the sauce and watch it melt. Lick your chops. Repeat as needed.


TPW_6042
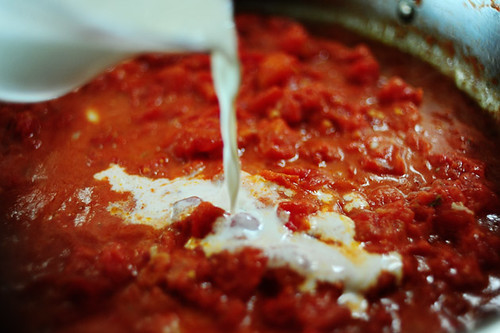
When it’s all melted, pour in some cream. You can use half cream, half half-and-half. (Half half-and-half? I’m dizzy.)


TPW_6055
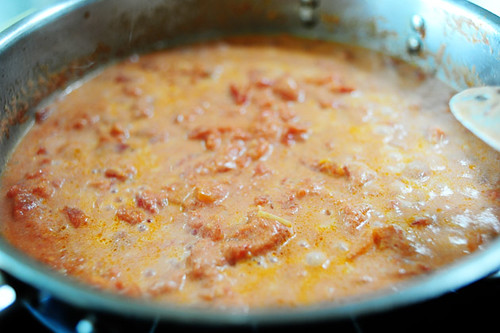
Shake the pan around and stir to combine the cream. Taste it and add in a dash of whatever it needs.


TPW_6063
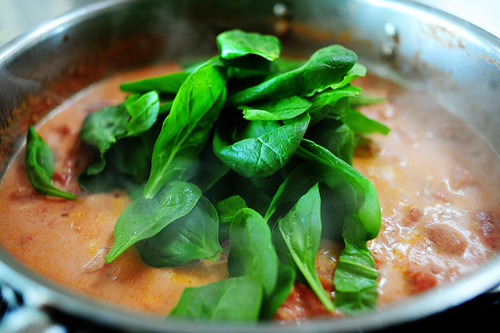
Now, this is the most important step! Turn off the burner. And at the very last minute—as in, people are sitting at the dinner table pounding their forks and knives and chanting “We wanna eat! We wanna eat!”—throw in a large amount of baby spinach. This is about two cups, but you really need to add twice this amount since the spinach shrinks away to almost nothing.


TPW_6066
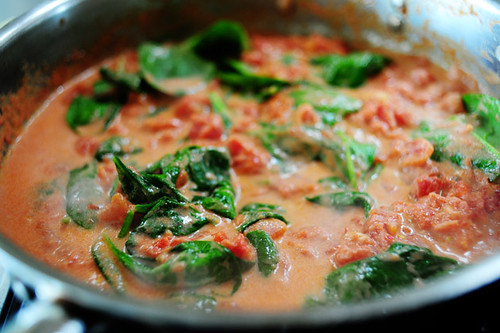
Don’t cook the spinach at all! Just toss it around and allow the heat of the sauce to wilt it. And act fast! This is best if the spinach still has a little life to it.


TPW_6071
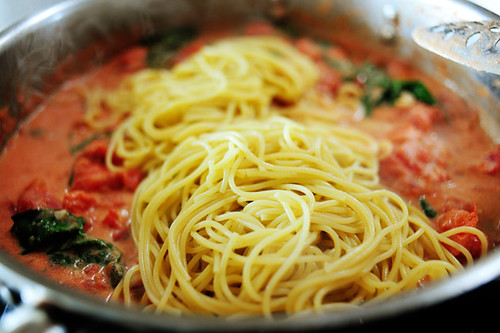
Immediately throw in the cooked pasta (or you can put the pasta in a bowl and pour the sauce over the top.)


TPW_6076
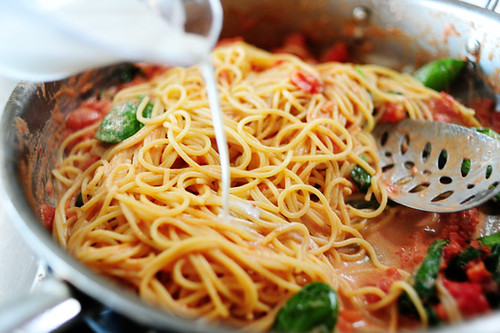
Toss it around, and if it seems a little thick…you can thin it with a little half-and-half.


TPW_6080Immediately pour it into a serving bowl and go for it! For presentation, it’s nice to add some blue cheese crumbles to the top.
But I was all by myself. Presentation wasn’t really a factor.


TPW_6104
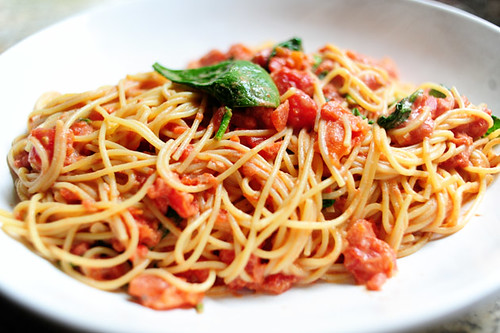
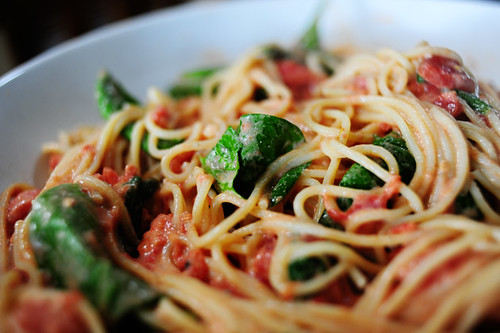
Lemme tell you something. This was divine. The blue cheese is a really unexpected flavor—looking at the dish, you expect it to be the typical tomato/parmesan/basil pasta. But then you take a bite and realize there’s more to life than tomato, parmesan, and basil pasta.
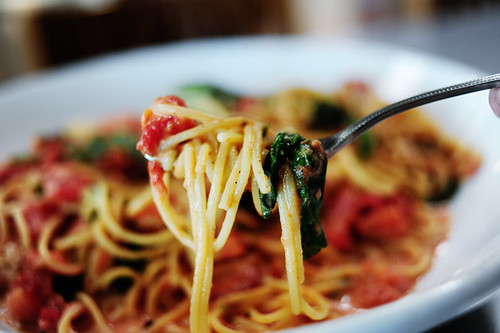

TPW_6100Enjoy!

Here’s the handy dandy printable:
 

Pasta with Tomato-Blue Cheese Sauce

   |      |      |   Print  
Sponsored by HPClick Here
Prep Time: 2 MinutesCook Time: 15 MinutesDifficulty: EasyServings: 6
Ingredients
  • 1-½ pound Pasta (angel Hair Or Thin Spaghetti)
  • 2 Tablespoons Olive Oil
  • 3 cloves Garlic, Minced
  • 1 whole 28-ounce Can Diced Tomatoes, Drained
  • Dash Of Sugar
  • Salt And Freshly Ground Black Pepper, To Taste
  • Crushed Red Pepper Flakes, To Taste
  • ¾ cups Crumbled Blue Cheese
  • ¾ cups Heavy Cream
  • 4 cups Baby Spinach
  • Half And Half, For Thinning
  • Extra Blue Cheese Crumbles, For Garnish
Preparation Instructions
Cook pasta according to package instructions.
In a large skillet over medium heat, add olive oil. When hot, add minced garlic and cook for a minute. Pour in drained tomatoes. Add sugar, salt, pepper, and crushed red pepper to taste. Cook for 10 to 15 minutes, stirring occasionally.
Reduce heat to low. Stir in crumbled blue cheese. Add cream and stir, then a little splash of half-and-half if sauce is too thick. Cook for a minute or two, tasting and adding more seasonings as needed.
At the very, very, very last minute. toss in spinach. Immediately toss in the cooked and drained pasta. Serve immediately!

Cinnamon Banana Muffins

This post courtesy of The Pink Apron


Cinnamon Banana Muffins

by KELLY on APRIL 28, 2010
BananacinnamonmuffinFirst off, thanks for all the thoughtful comments on my post Monday. I normally save emotions like that for my (offline) journal, but for some reason the idea of admitting to the world that I was not perfect seemed like good therapy.  And it was.  The moment I hit publish I felt as if a weight had been lifted off my shoulders. I’ve been feeling so much brighter ever since.  Nothing in my situation changed, only my attitude.  (Well to be honest, the sunshine we’ve been having and the fact that after a month long fight with the DMV I finally got my license plates for my car hasn’t hurt either.)  It seems appropriate then to share a recipe that’s a little bit lighter, although quite frankly compared to bacon that could be almost anything.  In this case it’s a muffin, and not just any muffin, but an incredibly moist, cinnamon-y muffin.  The cinnamon flavor comes from some Cinnamon Flav-R Bites that I picked up at the King Arthur Flour Baker’s Store on atrip to Vermont, but you could also use cinnamon chips.  With its cake flour base it is certainly not going to win a healthfulness award, but it is great for the times when you might want a lighter (in texture, not calories), moister muffin.  It would be great for a mother’s day brunch or to sell as a bake sale item.
Cinnamon Banana Muffins
Yields 12 muffins
Ingredients
-1 ½ cups mashed, very ripe bananas (about 4 bananas)
-3/4 cup sugar
-1/4 cup canola oil
-1/4 cup skim milk
-1 large egg
-1 ½ cups cake flour
-1 ½ teaspoons baking soda
-1 teaspoon salt
-1/2 cup cinnamon Flav-R Bites (or alternatively cinnamon chips)
Method
Preheat oven to 350 degrees. Either line a muffin tin with papers, spray with non-stick cooking spray, or if using fancy pants papers as above, just set them on a baking sheet. In a medium bowl, stir together bananas, sugars, butter, milk and egg. In another bowl, whisk together flour, espresso powder, baking soda and salt. Make a well in the center of the dry ingredients and add the wet ingredients, stirring until barely combined. Gently fold in chips–don’t overwork the batter!–and then fill muffin cups 3/4 full. Bake for about 20 minutes or until a toothpick inserted in the middle comes out clean. Cool in the pan for about 15 minutes before removing.

Monday, April 26, 2010

Refrigerator cat


Orange Rolls...Yummy!!


Orange Rolls

For the rolls:
1/2 cup water
1/2 cup milk
1/3 cup sugar
2 1/4 teaspoons active dry yeast (.25 oz package)
1 egg
1/3 cup butter, softened
1 teaspoon salt
3 3/4 cups bread flour
 
For the filling:
1 cup brown sugar
1/3 cup butter, softened
zest of two oranges
 
For the glaze:
3 oz cream cheese, softened
1/4 cup butter, softened
1 1/2 cup powdered sugar
1/2 teaspoon almond extract
juice of 1/2 orange
1/8 teaspoon salt
 
In a small saucepan, heat the milk and water until the mixture reaches 120 degrees.  Pour the mixture into the bowl of a stand mixer fitted with a dough hook.  Add the sugar and yeast, stir once, and let sit until the mixture bubbles (around 10 minutes).  
 
With the mixer on medium low speed, add the egg, butter, salt and flour.  Increase the speed to medium for 8 minutes.  The dough will be slightly sticky.  
 
Grease a medium metal bowl.  Add the dough, and turn to coat the top.  Cover with a towel and let the dough rise in a warm place for one hour. After the first rise, deflate the dough, and cover again with the towel while you mix together the filling ingredients. 
 
Turn the dough out onto a lightly floured surface and roll into a 25 x 6 inch rectangle (you may want to split this into two 13 x 6 inch rectangles). Spread with the filling mixture.  Roll up the dough and pinch together.  Slice into 24 one inch slices and place on a baking sheet.  Cover with saran wrap and refrigerate overnight.  Alternately, cover with a clean kitchen towel and let rise in a warm place for about 45 minutes. 

Let the refrigerated rolls sit at room temperature for about 30 minutes.  Preheat the oven to 350°.  Bake in a preheated oven for 20-25 minutes, until the tops of the rolls begin to brown.  While the rolls bake, whisk together the icing ingredients until smooth.  Remove the rolls from the oven and top with the icing.

Fruit Salsa with Cinnamon Sugar Pita Chips

This post comes courtesy of Two Peas and Their Pod


Fruit Salsa with Cinnamon Sugar Pita Chips

Post image for Fruit Salsa with Cinnamon Sugar Pita Chips
by TWOPEAS on APRIL 26, 2010
I usually don’t crave salty foods, I prefer sweets. I don’t have sweet tooth, I think ALLof my teeth are sweet:) Chips and salsa are an exception-that is my “go to” salty snack. I love Josh’s mango salsa-it is my favorite. I love the sweetness the mango brings to the mix-see I try to sneak in sweets wherever I can:) The other day I was in the mood for chips and salsa, but didn’t have any fresh cilantro. I was too lazy to run to the store, so I made a batch of fruit salsa instead.
I combined strawberries, kiwi, blackberries, and blueberries. I added a squeeze of fresh lemon juice and a tiny drizzle of agave nectar and stirred everything together. I was going to make homemade pita chips, but again my laziness got in the way, so I opened a bag of Stacy’s Cinnamon Sugar Pita Chips. Have you tried these? They are heavenly, be careful though-they are very addicting.
So what started as a salty craving, ended in a new favorite sweet snack. My salty craving was easily transitioned into a sweet version of chips and salsa. My sweet side always takes over:) Fruit salsa is easy to prepare and a beautiful dish to share. I think this will be my staple summer party food-perfect for picnics, bbq’s, and pool parties. And don’t forget about Cinco de Mayo-get the party started with fruit salsa!
Fruit Salsa with Cinnamon Sugar Pita Chips
8 Strawberries, diced
2 Kiwi, diced
1/4 cup Blueberries
1/4 Blackberries, cut in half
Squeeze of fresh lemon juice
Drizzle of agave nectar
Cinnamon Sugar Pita Chips-for serving
1. In a medium bowl, stir together the strawberries and kiwi. Gently add in the blueberries and blackberries. Stir carefully so you don’t turn the salsa purple.
2. Squeeze fresh lemon juice over the fruit. Add a tiny drizzle of agave nectar to bring out the sweetness in the fruit. Stir carefully.
3. Serve with cinnamon sugar pita chips.
*Note-the fruit salsa is best eaten the day it is made.
If you like this fruit salsa, you might also like:
Mango Salsa from Two Peas and Their Pod
Black Bean Salsa from Two Peas and Their Pod
Fresh Apple Salsa from 101 Cookbooks
Cantaloupe Salsa from Smitten Kitchen
Pineapple Salsa from Serious Eats